| Author |
Topic: 1950S 4 Neck Wright Custom10 string "Restoration Prog |
Bob Gibler
From:
Kansas, USA
|
 Posted 21 Apr 2013 6:37 am
 |
|
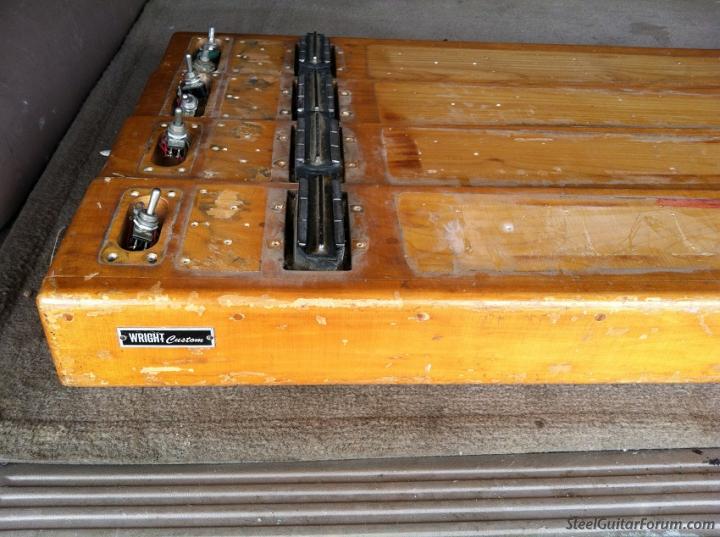
I am very pleased to announce that the first phase of Restoration on My Fathers Wright Custom 4 Neck Steel is well under way.
I have very carefully disassembled and cataloged every piece of hardware attached to this marvelous instrument, and have started taking the grime off of the Aluminum and steel components.
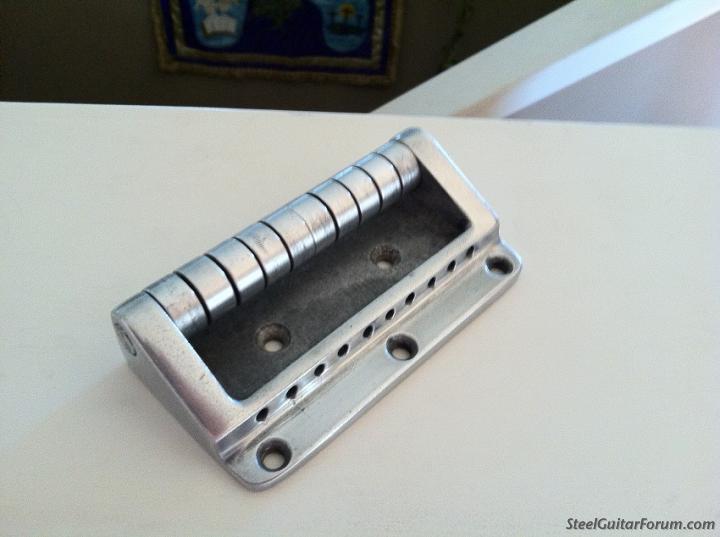
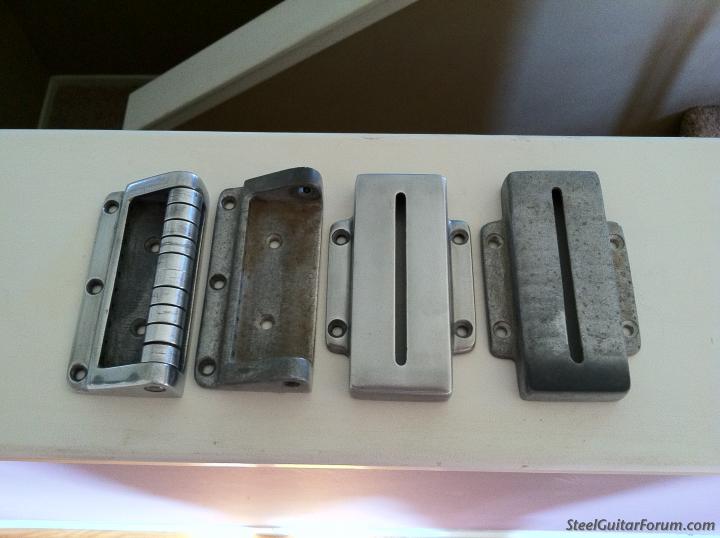
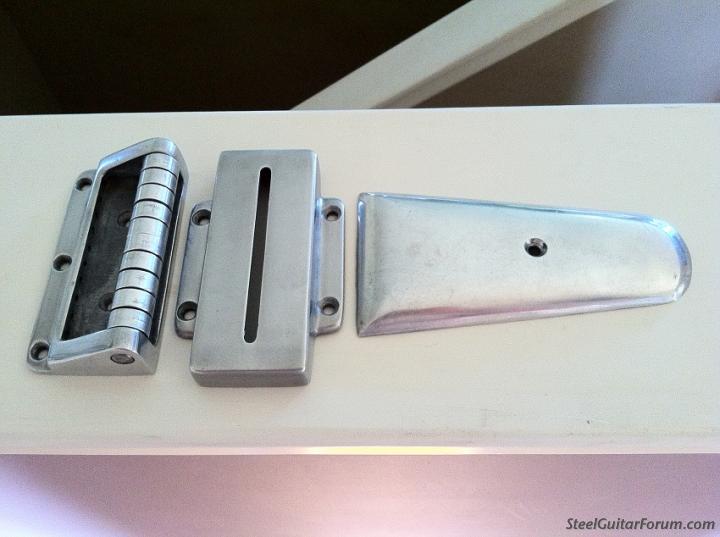
In the photos below you will see the first phase of cleaning that is under way. I started by loosening all of the hex nuts that hold the bridge axles in place, and carefully punch the axles out with a brass drift punch to remove the rollers and bushings.
The dirt, Grime and gunk build up made this job very tedious as not to mar or torque the aluminum bridge skeleton. But all 40 rollers and 32 copper bushings came off with no problem.
I spent all night Saturday night and all of yesterday just getting the grime off of the steel rollers and the copper bushings and most of the Aluminum hardware. that job is almost complete.
Polishing on the wheel with rouge will be a pleasure from here. YET TO BE DONE....
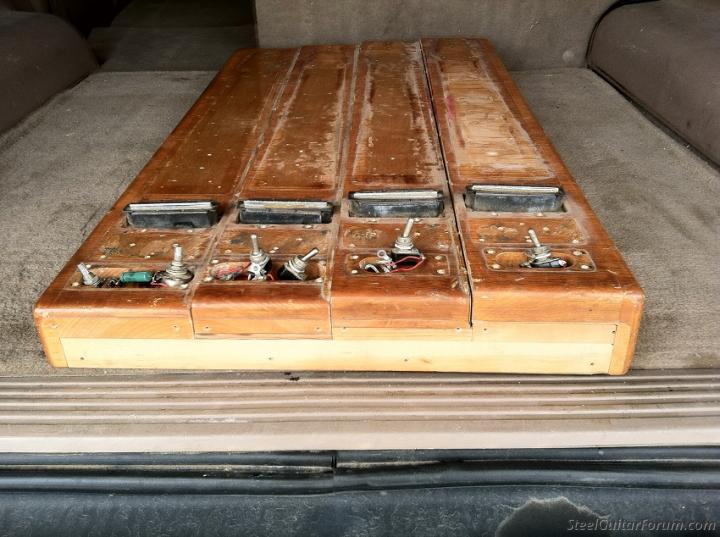
The cabinet as you can see is bare, except for the electronics. I have tested all of the single coil pickups. and have only one that is not working.
The switches are in excellent working order and the pots are as well.
on to the first photos.
 [/b] [/b]
I hope you will enjoy this restoration as much as I am enjoying the results. David. thank you for all of your help. |
|
|
 |
Jay Fagerlie
From:
Lotus, California, USA
|
Posted 21 Apr 2013 7:25 am
|
|
 |
|
|
|
Len Amaral
From:
Rehoboth,MA 02769
|
Posted 21 Apr 2013 7:59 am
|
|
The resoration process will be a great project. Can't wait to see th finished project.
Best wishes,
Lenny |
|
|
|
Len Amaral
From:
Rehoboth,MA 02769
|
Posted 21 Apr 2013 8:00 am
|
|
Double post sorry..... 
Last edited by Len Amaral on 21 Apr 2013 9:20 am; edited 1 time in total |
|
|
|
Ken Byng
From:
Southampton, England
|
Posted 21 Apr 2013 9:11 am
|
|
Bob
This will be a very interesting renovation/restoration project to follow on here. I hope you don't get any criticism from the 'keep it all original at all cost' brigade. I have a feeling that it will look pretty wonderful when it is completed.
_________________
Show Pro D10 - amber (8+6), MSA D10 Legend XL Signature - redburst (9+6), Sho-Bud Pro 111 Custom (8+6), Emmons black Push-Pull D10 (8+5), Zum D10 (8x8), Hudson pedal resonator. Telonics TCA-500, Webb 614-E, |
|
|
|
Bob Gibler
From:
Kansas, USA
|
Posted 21 Apr 2013 10:39 am
|
|
| Ken Byng wrote: |
Bob
This will be a very interesting renovation/restoration project to follow on here. I hope you don't get any criticism from the 'keep it all original at all cost' brigade. I have a feeling that it will look pretty wonderful when it is completed. |
Ken,
 I'm Just surprised that there might be those who would want it left in it's present unplayable state. I'm Just surprised that there might be those who would want it left in it's present unplayable state.
I have decided to restore the Wright in the same finish and components that it was built with, in keeping with the traditions of assembly that Mr Chuck Wright himself would have used and approved.
The finish is a Nitro cellulose clear lacquer, and I have ordered a gallon of it and 2 quarts of sealer to be sure that there will be enough to complete the finish.
I am gathering very important information from 3 Forum members on this site Starting with David Wright, Who know these guitars inside and out so that the restoration is correct, and complete.
This "resto" will not be a hurry up thing as the finish itself takes many days to complete and to harden, I am a stickler for details.
NO SHORTCUTS HERE. I did say harden, Not Cure did I not? before I can even start thinking about assembling the hardware to the necks.
I appreciate all concerns and comments on this Restoration. As I feel that I owe it to David's Dad, My Dad, and ALL concerned Steel Guitar players out there to do this project WRIGHT.
I hope that you will all enjoy this restoration |
|
|
|
Len Amaral
From:
Rehoboth,MA 02769
|
Posted 21 Apr 2013 12:18 pm
|
|
Just throwing out a few thoughts on finishing. Many years ago I was furniture repair and finisher. If there is an auto fininsh supply center get some tack racks to wipe down the surface after you blow off all areas with blow gun tool and comrpessor after the sanding process and finish with (#150) to the bare wood. Use 40 PSI at the spray gun and thin the sealer down as suggested. Sand inbetween coats of sealer with 400 sand paper and with laquear on the last two coats use 500 and 600 sand paper with water and several drops of soap for lubrication. Use the tack rag between every process.
Have some fish eye additive on hand if needed and reatrder to mix in with the laquer to slow the drying down for a lightly sprayed wet look.
For a hand rubbed look, you can use the same water and soap solution with 600 sand paper and then 0000 steel wool with lemon oil and pumice. Takes a lotof time but a rewarding venture for sure. The above is just a suggestion.
Lenny |
|
|
|
Bob Gibler
From:
Kansas, USA
|
Posted 21 Apr 2013 3:16 pm
|
|
| Len Amaral wrote: |
Just throwing out a few thoughts on finishing. Many years ago I was furniture repair and finisher. If there is an auto fininsh supply center get some tack racks to wipe down the surface after you blow off all areas with blow gun tool and comrpessor after the sanding process and finish with (#150) to the bare wood. Use 40 PSI at the spray gun and thin the sealer down as suggested. Sand inbetween coats of sealer with 400 sand paper and with laquear on the last two coats use 500 and 600 sand paper with water and several drops of soap for lubrication. Use the tack rag between every process.
Have some fish eye additive on hand if needed and reatrder to mix in with the laquer to slow the drying down for a lightly sprayed wet look.
For a hand rubbed look, you can use the same water and soap solution with 600 sand paper and then 0000 steel wool with lemon oil and pumice. Takes a lotof time but a rewarding venture for sure. The above is just a suggestion.
Lenny |
Len,
Thanks for the suggestions, I will keep all in mind.
I have used Lacquers in smaller projects in the past and Yes I will have many tac cloths on hand. I am prepared to be patient on wet sanding as well.
My question is " How long between coats do I wait until wet sanding the Lacquer on such a large job. i will be working in a Humidity controlled room on the finish. Len, it Sounds like you have had plenty of experience with Lacquer finishes. And I never heard of Fish eye additives. What does it do?
After all of the hardware is polished and ready to go onto the Steel, I will begin to start on the wood. I plan to let the wood breath for a couple of day's after stripping so The humidity will even out. The maple and rosewood looks as though it needs it.
Does the soap just act as a lubricant while buffing out the finish? I am prepared to spend many Hours in spraying, sanding and polishing.
I sure appreciate the information.
Bob Gibler |
|
|
|
Jay Fagerlie
From:
Lotus, California, USA
|
Posted 21 Apr 2013 3:24 pm
|
|
I for one would not be upset in the least if this topic ended up being a 'how to ' as well as a pic-fest.
Thanks for the education in advance.
 |
|
|
|
Len Amaral
From:
Rehoboth,MA 02769
|
Posted 21 Apr 2013 4:55 pm
|
|
Hi Bob....first off....you never use your hand with sand paper of any grit......ok maybe on round areas or places a flat rubber or felt block wont fit in a small area with the sand paper on it.
Use an empty dish water bottle and fill 3/4 way with fresh water then a tea spoon of dish soap and shake it up good. Spraying in a controlled area is great but get a humidity gauge at walmart for about $10.00 and if is damp or raining wait untill the humidity is 40 to 50%.
Compressor tanks have small amounts of oil and all types of contaminants even if they have water and line filters. This causes a condition called fish eye. A few drops in the laqure and a touch of retarder in th mix will prevent the fish eye. The best thing to do is trial on a sample piece of wood.
I would try after sanding and two coats of sanding sealer with 400 sanding between each coat and do not use the water with soap as that is only for the lacquer. Three or four coats should be good but give as many as you like repeating the process but remember the 600 and 0000 wool with lemon or other finish oil and pumice and rub with the grain after the last coat only. One coat a day should be ok between coats with a nice even spray swipe continuing off the edge then stop and drop down to the next swipe and start the gun again. This prevents overloading the edges. Also hold the spray gun 8 to 10 inches your work with a 4 to 5 inch fan of smooth spray is what you are looking for. HOPE THIS HELPS.... |
|
|
|
Bob Gibler
From:
Kansas, USA
|
Posted 21 Apr 2013 5:32 pm
|
|
| Len Amaral wrote: |
Hi Bob....first off....you never use your hand with sand paper of any grit......ok maybe on round areas or places a flat rubber or felt block wont fit in a small area with the sand paper on it.
Use an empty dish water bottle and fill 3/4 way with fresh water then a tea spoon of dish soap and shake it up good. Spraying in a controlled area is great but get a humidity gauge at walmart for about $10.00 and if is damp or raining wait untill the humidity is 40 to 50%.
Compressor tanks have small amounts of oil and all types of contaminants even if they have water and line filters. This causes a condition called fish eye. A few drops in the laqure and a touch of retarder in th mix will prevent the fish eye. The best thing to do is trial on a sample piece of wood.
I would try after sanding and two coats of sanding sealer with 400 sanding between each coat and do not use the water with soap as that is only for the lacquer. Three or four coats should be good but give as many as you like repeating the process but remember the 600 and 0000 wool with lemon or other finish oil and pumice and rub with the grain after the last coat only. One coat a day should be ok between coats with a nice even spray swipe continuing off the edge then stop and drop down to the next swipe and start the gun again. This prevents overloading the edges. Also hold the spray gun 8 to 10 inches your work with a 4 to 5 inch fan of smooth spray is what you are looking for. HOPE THIS HELPS.... |
Len, 'This is a perfect tutorial in spraying lacquer. Thank you very much. As I mentioned, I will have the Wright 4 neck in a climate controlled environment with ventilation. And I will be using a respirator. Your insight is most valuable, especially with the application and the tweaking of the Lacquer and the fish eye effect. I can not wait to start sealing the wood.... But I must be patient.. Again. Your Thoughts are always welcome.
Thank you.
Bob. |
|
|
|
Len Amaral
From:
Rehoboth,MA 02769
|
Posted 21 Apr 2013 10:15 pm
|
|
Another thought: Clear laquer is a nice look but Stewart McDonald has a "yellowing tint" you can add to the laquer to give you a bit of an "aged" look. The wood looks like maple so to strip, sand with natural sealer and laquer will give a whitish clear look and by adding the yellowing tint on several middle coats of laquer will tone the clearness down.
Once again, get a clear sanded piece of maple to practice with. Also, you have a lot of work surface to sand after stripping and it's OK to to use a hand held vibrating sander. NEVER use a belt sander as you will create an uneven lopsided effect that will magnify through the clear laquer. |
|
|
|
David Wright
From:
Pilot Point ,Tx USA.
|
Posted 22 Apr 2013 3:02 am
|
|
keeping a eye on ya  L@@king forward to watching your progress.. L@@king forward to watching your progress.. |
|
|
|
Bob Gibler
From:
Kansas, USA
|
Posted 22 Apr 2013 3:08 am
|
|
| Len Amaral wrote: |
Another thought: Clear laquer is a nice look but Stewart McDonald has a "yellowing tint" you can add to the laquer to give you a bit of an "aged" look. The wood looks like maple so to strip, sand with natural sealer and laquer will give a whitish clear look and by adding the yellowing tint on several middle coats of laquer will tone the clearness down.
Once again, get a clear sanded piece of maple to practice with. Also, you have a lot of work surface to sand after stripping and it's OK to to use a hand held vibrating sander. NEVER use a belt sander as you will create an uneven lopsided effect that will magnify through the clear laquer. |
Len,
I plan to block sand all of the flat areas with 4" 6" 8" sanding blocks and hand sand the corners giving care to keep the shape true.
As I might have said I am very patient in dealing with the finish.
Stewart McDonald Tint Huh? Sounds right up my alley. I will check into it then.
Thanks.
Bob. |
|
|
|
Bob Gibler
From:
Kansas, USA
|
Posted 22 Apr 2013 3:14 am
|
|
| David Wright wrote: |
| keeping a eye on ya L@@king forward to watching your progress.. |
Thanks David, I was hoping that you would keep an eye on this post. |
|
|
|
Chris Lucker
From:
Los Angeles, California USA
|
Posted 22 Apr 2013 9:27 am
|
|
I have had two Wrights -- both early examples. One was the other quad currently discussed on the Forum, and the other is in parts on its way to being restored. The finishes were shot on both guitars. I had an art restoration expert at the Getty analyze both finishes for me, and they were both simple shellac -- essentially like the amber "orange" shellac you can buy today. I had no nitro on my Wrights. Just as you won't find a Bigsby with Nitro either. He used something else entirely.
_________________
Chris Lucker
Red Bellies, Bigsbys and a lot of other guitars. |
|
|
|
Bob Gibler
From:
Kansas, USA
|
Posted 22 Apr 2013 2:21 pm
|
|
| Chris Lucker wrote: |
| I have had two Wrights -- both early examples. One was the other quad currently discussed on the Forum, and the other is in parts on its way to being restored. The finishes were shot on both guitars. I had an art restoration expert at the Getty analyze both finishes for me, and they were both simple shellac -- essentially like the amber "orange" shellac you can buy today. I had no nitro on my Wrights. Just as you won't find a Bigsby with Nitro either. He used something else entirely. |
Chris,
I am conflicted on the finish now, as I was told that the finish on this Wright was Nitro Cellulose Lacquer....Could it actually be a Shellac????? I had better get another chip looked at. If it is indeed Shellac, I will return the Lacquer...This finish has to be correct for this instrument... Thank you for the heads up...   |
|
|
|
Bill Ladd
From:
Wilmington, NC, USA
|
Posted 22 Apr 2013 6:09 pm
|
|
Bob - I hope that wasn't based on the info I gave you. As I wrote in the PM, I was just guessing that it was lacquer.
For me, though, that fact that Mr. Wright used shellac is awesome news! Shellac is pretty easy to lay down - brush or pad on and sand between coats. I've gotten some nice glossy finishes with it in the past.
Really liking this thread. The pics of your blade pickups with the covers off was just what I needed to see, as I want to build some blade pickups for mine. |
|
|
|
Len Amaral
From:
Rehoboth,MA 02769
|
Posted 22 Apr 2013 7:02 pm
|
|
Old time shellac has a yellowish effect and is thinned with denatured alcohol. Easy to work with especially with a brush and can be wet sanded and rubbed with 0000 steel wool as mentioned. Drys fairly fast.
Last edited by Len Amaral on 23 Apr 2013 5:44 am; edited 2 times in total |
|
|
|
Chris Lucker
From:
Los Angeles, California USA
|
Posted 22 Apr 2013 11:14 pm
|
|
Please do not jump to the conclusion that Wtight always used orange shellac because I found it. One of Marty Smith's Wrights looked like it had spar varnish. I was just saying do not assume it was nitro. You see Bigsbys refinished with nitro too, when nitro is not what was used originally.
Don't rely on what someone else tells you your original finish is. You have the guitar. You determine what it is in your case and share it with is if you wish.
This reply may belong in the other thread.
_________________
Chris Lucker
Red Bellies, Bigsbys and a lot of other guitars. |
|
|
|
Bob Gibler
From:
Kansas, USA
|
Posted 23 Apr 2013 3:10 am
|
|
| Chris Lucker wrote: |
Please do not jump to the conclusion that Wtight always used orange shellac because I found it. One of Marty Smith's Wrights looked like it had spar varnish. I was just saying do not assume it was nitro. You see Bigsbys refinished with nitro too, when nitro is not what was used originally.
Don't rely on what someone else tells you your original finish is. You have the guitar. You determine what it is in your case and share it with is if you wish.
This reply may belong in the other thread. |
Chris, Bill Len,
Thank s for the information that you folks are providing. No in no way will I jump to conclusions here.
I am finding that Mr Wright might have experimented with finishes in the evolution of his famous instruments.
I just want to get the correct finish on this guitar. I took a 3/4" scab of finish from the skirt of the 4 neck about a week ago to a dutch boy paint store to get it looked at under the scope and the young man there said it was most likely Nitro Cellulose Lacquer.
My thought is to do it again, and see if it is what it is!.
I do completely appreciate all who chime in here, Because I value the education on these fine instruments that I am receiving.
And again I will not rush this job. It has to be WRIGHT... |
|
|
|
Bob Gibler
From:
Kansas, USA
|
Posted 23 Apr 2013 3:13 am
|
|
| Bill Ladd wrote: |
Bob - I hope that wasn't based on the info I gave you. As I wrote in the PM, I was just guessing that it was lacquer.
For me, though, that fact that Mr. Wright used shellac is awesome news! Shellac is pretty easy to lay down - brush or pad on and sand between coats. I've gotten some nice glossy finishes with it in the past.
Really liking this thread. The pics of your blade pickups with the covers off was just what I needed to see, as I want to build some blade pickups for mine. |
Very cool Bill. I am glad that the photos have inspired you.... I will be posting more photos this week as progress continues. Have a blessed day. |
|
|
|
Len Amaral
From:
Rehoboth,MA 02769
|
Posted 23 Apr 2013 5:56 am
|
|
Hey Bob:
I would get a few pieces of maple or birch as they are very similar with a tight grain. Try the the shellac and spray on laquer. Make sure you get the yellow "old time" shellac as I believe that is the tone color yhat is desireable for that instrument. The clear laquer without staining the wood or tinting the laquer will give a protective but too "natural clear" of an effect on the instrument. A very light
thinned down "fruitwood" color stain may give you that yellow tint that is era correct.
Like I said, get a bunch of pieces of test pieces and try all of the above to see what works best. Keep us up to date on this. I refinished an antique desk that my sister did her homework on 50 years ago. I'll see if I can find pictures.
Lenny |
|
|
|
David Wright
From:
Pilot Point ,Tx USA.
|
Posted 23 Apr 2013 6:10 am
|
|
You might check with Mark Giles on a good and easy material to use, I do know when dad was working with Ernie Ball, he used auto clears on the guitars .. food for thought....  |
|
|
|
Bob Gibler
From:
Kansas, USA
|
Posted 23 Apr 2013 2:49 pm
|
|
| David Wright wrote: |
| You might check with Mark Giles on a good and easy material to use, I do know when dad was working with Ernie Ball, he used auto clears on the guitars .. food for thought.... |
David,
I will do that very thing. Man oh Man I really appreciate having you guys chiming in on this project.
This project is a blast.
Thanks to all. |
|
|
|