| Author |
Topic: Project |
Bent Romnes
From:
London,Ontario, Canada
|
 Posted 19 May 2007 2:43 pm
 |
|
Ok here's the scoop. I am building a pedal steel for home use.
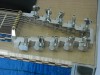
This one is not intended to be pretty or flashy. A few cents cabinet drop is acceptable. I am planning on making the changer mech myself with hand tools. The few proto types of fingers I have been able to make look promising. I have scrounged some old parts like this old gumby key head:

As you see I have cut the hook off. The aluminum was very rough with scratches and gouges. As you also can see, I have started to restore it. So far I have sanded it with 2 grits on a sanding drum ( 80 and 120 I think. There are scratches from the sanding.
What I wanted to ask your advice on is: Should I keep sanding, progressing to a finer grit, say 180, 220, 320 etc? And then what? Say after 320, should I start with a compound on a buffing wheel?
These questions apply to all the aluminum parts of course.
Or, would I be better off getting everything chromed?
Your advice would be greatly appreciated! |
|
|
 |
Danny James
From:
Summerfield Florida USA
|
Posted 19 May 2007 7:42 pm
|
|
I graduate down to 400 grit wet or dry sandpaper or even 600 grit would be better. Then use an aluminum buffing compound and a good buffing wheel on a 1/2 hp. motor. Wear gloves and have a pail of water handy. It will get hot quick.
It will shine until you can see yourself in it if you have patience, with no scuff marks showing. |
|
|
|
Per Berner
From:
Skovde, Sweden
|
Posted 20 May 2007 12:23 am
|
|
| If you want to chrome the parts, you'll have to polish them even more. The chrome will not hide any scratches at all. |
|
|
|
Bent Romnes
From:
London,Ontario, Canada
|
Posted 20 May 2007 5:31 am
|
|
Danny, Per
Thanks for great advice! I think I will forget the chrome plating and do the polishing/buffing instead
I have some wet/dry paper called "mirror finish", no number on the grit. Would you know if this would be finer than 400, maybe even 600? I tried it wet..no good. The result came up dull. As soon as I did a dry sanding, it shone up in no time. |
|
|
|
Danny James
From:
Summerfield Florida USA
|
Posted 20 May 2007 8:21 am
|
|
Bent,
I don't know anything about the wet & dry mirrow finish sand paper. But it sounds like it would be OK toward the end of the sanding process.
Do not worry about the dull finish the sandpaper leaves, the buffing will take care of that. 
(buffing compound ( sticks )can be bought in different grades of abrasiveness too, at your local supply such as Lowes, Home depot,& Menards)
If the buffing doesn't take out all the scratches then go back to the sanding process until the deep scratches are gone then re-buff. 
You need to try to get the scratches out before buffing. However, sometimes you won't realize the scratches are there until you buff the first time.
By experimenting a little you will end up with a mirrow finish. 
Best of luck |
|
|
|
Jani Peter Sandvik
From:
Kolppi Finland
|
Posted 23 May 2007 1:41 am
|
|
well its fun to see it coming to
i have the necks ready polished. and when the necks were raw i took 240 paper with the vib/rotator so i get the scratches that the milling mashine left and grind it and then after that i took 400 and after that i took the basic polishing tool on a drill machine and started doing the surface and after clean it with the fine polishing cloth
_________________
Sandwich Productions
https://www.facebook.com/sandwichproducts/ |
|
|
|
Bent Romnes
From:
London,Ontario, Canada
|
Posted 23 May 2007 3:06 pm
|
|
Hi guys,
I think I have come up with the solution that works for me:
First sanding: Random Orbit sander with 220 grit.
Then hand sand dry, with 350 grit, 400, 600 and 1000.
For a final shine, use a product called NevrDull. It is a cotton-type wadding in a can an dis impregnated with a liquid and, I think, something very mildly abrasive. |
|
|
|
Dennis Schell
From:
Shingletown, Shasta county, Kalifornia
|
Posted 24 May 2007 1:21 pm
|
|
For awhile I "apprenticed" with a PSG builder, building cases and polishing EVERY aluminum part, even the undercarriage parts. Trust me, if you expect to do much polishing, forget the "Nevrdull" and get ahold of an old electric motor and put a buffing wheel on it. You get a better finish with MUCH less effort!
FWIW,
Dennis
BTW, you can sell the "Nevrdull" at the nearest truckstop. Gearjammers are forever "detailing" their aluminum wheels etc with that stuff...
_________________
"Bucks Owin" |
|
|
|
Jani Peter Sandvik
From:
Kolppi Finland
|
Posted 24 May 2007 1:32 pm
|
|
| Dennis Schell wrote: |
For awhile I "apprenticed" with a PSG builder, building cases and polishing EVERY aluminum part, even the undercarriage parts. Trust me, if you expect to do much polishing, forget the "Nevrdull" and get ahold of an old electric motor and put a buffing wheel on it. You get a better finish with MUCH less effort!
FWIW,
Dennis
BTW, you can sell the "Nevrdull" at the nearest truckstop. Gearjammers are forever "detailing" their aluminum wheels etc with that stuff... |
yep youre right
_________________
Sandwich Productions
https://www.facebook.com/sandwichproducts/ |
|
|
|
Bent Romnes
From:
London,Ontario, Canada
|
Posted 25 May 2007 6:39 am
|
|
I'll take that as excellent advice. Exit the Nevrdull!!
I don't have a buffing wheel and motor. And I don't mind the extra elbow grease. So...going thru the sand paper grits up to 1000 produces great results. For that extra mirror shine I have been trying Turtle wax polishing compound (mildly abrasive) as the final polish. Does that sound ok to you, Dennis?
By the way, if I should choose to use buffing compund...would this work equally well on my random orbit sander with a polishing hood on it?
| Jani Peter Sandvik wrote: |
| Dennis Schell wrote: |
For awhile I "apprenticed" with a PSG builder, building cases and polishing EVERY aluminum part, even the undercarriage parts. Trust me, if you expect to do much polishing, forget the "Nevrdull" and get ahold of an old electric motor and put a buffing wheel on it. You get a better finish with MUCH less effort!
FWIW,
Dennis
BTW, you can sell the "Nevrdull" at the nearest truckstop. Gearjammers are forever "detailing" their aluminum wheels etc with that stuff... |
yep youre right |
|
|
|
|
Bent Romnes
From:
London,Ontario, Canada
|
Posted 25 May 2007 6:45 am Changer end.
|
|
Ok on to the next question.
What is the main reason for the aluminum plate at the changer end?
Looks?
Strength for solid installation of changer?
I was thinking of using aluminum in changer assembly only and mounting it with bolts and nuts to the wood neck and body.
I notice that is how it was done on some old brands.
Would this make a slight difference soundwise say if a guy is chasing the wood sound? |
|
|
|
Dennis Schell
From:
Shingletown, Shasta county, Kalifornia
|
Posted 25 May 2007 9:47 am Re: Changer end.
|
|
| Bent Romnes wrote: |
Ok on to the next question.
What is the main reason for the aluminum plate at the changer end?
Looks?
Strength for solid installation of changer?
I was thinking of using aluminum in changer assembly only and mounting it with bolts and nuts to the wood neck and body.
I notice that is how it was done on some old brands.
Would this make a slight difference soundwise say if a guy is chasing the wood sound? |
I'm not sure what "aluminum plate at the changer end" you're referring to. Depending on which "end" it could be a return stop for the lower fingers? Maybe the return springs hook to it? Are there rods coming through it? Is it the end plates where the legs attach? Need more info!
"Wood sound" has me confused too. Wood neck vs aluminum? Lacquered (sp) wood body vs formica covered?
Dennis
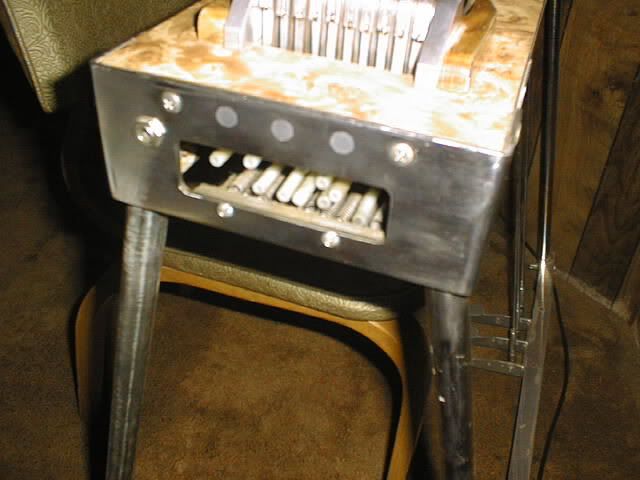
The "business end" of a PSG can look different depending on the design and builder. My guitar has end plates recycled from previous "prototype" efforts. (Notice the aluminum plugs in the steel plate) The other end has 13 holes in it from a (not so great) "U-13" project! 
_________________
"Bucks Owin" |
|
|
|
Ron !
|
Posted 25 May 2007 12:38 pm
|
|
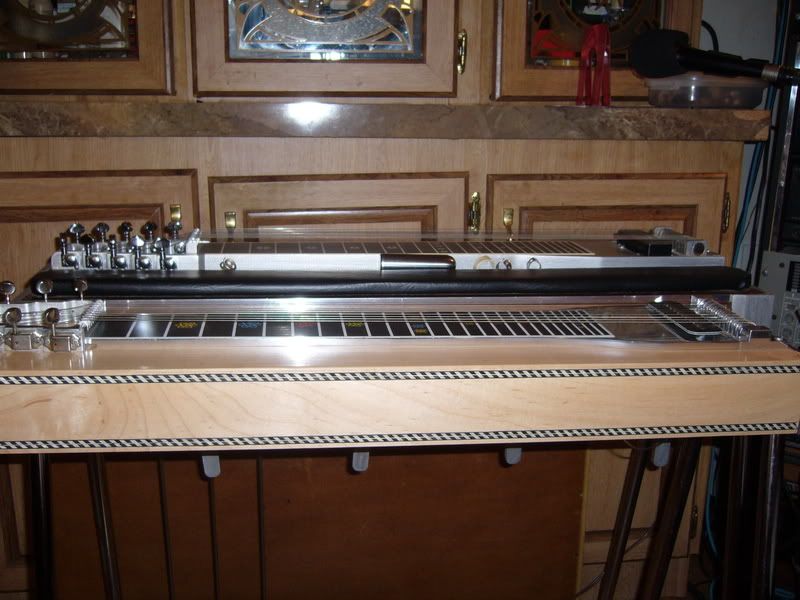
Use a 1000 grit.When done with that you use the finest steel wool you can buy and sand with that rotating clock-and counter clock wise.After that you buff it till mirror finish.It will take you some time but you have the best finish there is.Thats the way i do all my parts.
The steel on the front is a Re-done student model and the one in the back is a regular sanded and buffed steel.
 |
|
|
|
Bent Romnes
From:
London,Ontario, Canada
|
Posted 25 May 2007 1:58 pm
|
|
Dennis,
What I meant was, if there is a wood neck, then it stops short of the pickup and changer mech and the rest is a machined aluminum plate with holes for the pickup and changer mech.
With Aluminum necks the question never arises since the neck extends all the way to the end of the body. basically an extension of the wood neck.
Wood sound is just a term I used because of some people's opinion that a real wood body and neck give a different sound than metal.
Yes, I have made a wood neck and will be making a wood body (birds eye maple). |
|
|
|
Bent Romnes
From:
London,Ontario, Canada
|
Posted 25 May 2007 2:07 pm
|
|
Hi Ron,
Wow!!! is about all I can say! Fine steel wool huh? On the aluminum? Ok I'll try anything once.
Another question: At what angle do I drill the holes for the legs? |
|
|
|
Jani Peter Sandvik
From:
Kolppi Finland
|
|
|
|
Bent Romnes
From:
London,Ontario, Canada
|
Posted 27 May 2007 5:38 am
|
|
H Jani,
Thanks...random orbit sander ..I got that. Maybe a polishing bonnet on it and I am off to the races eh?
The drill..do you feel that you get enough speed on the drill to do fast, effective polishing? Anyways, that is worth a try also.
Thanks for sharing.
My worst dilemma now is to make end plates. I have some but they are a generic kind, not too pretty. I think I will end up having someone weld some together for me, and then weld in a block in the corners for the leg hole. Can you tell me what the correct angle for that hole is?
Bent |
|
|
|
Ron !
|
|
|
|
Bent Romnes
From:
London,Ontario, Canada
|
Posted 27 May 2007 8:39 am
|
|
Thanks Ron,
Yes, Jim Flynn has some nice stuff...and reasonable too!
Bent |
|
|
|
Jani Peter Sandvik
From:
Kolppi Finland
|
Posted 28 May 2007 5:11 am
|
|
| Bent Romnes wrote: |
H Jani,
Thanks...random orbit sander ..I got that. Maybe a polishing bonnet on it and I am off to the races eh?
The drill..do you feel that you get enough speed on the drill to do fast, effective polishing? Anyways, that is worth a try also.
Thanks for sharing.
My worst dilemma now is to make end plates. I have some but they are a generic kind, not too pretty. I think I will end up having someone weld some together for me, and then weld in a block in the corners for the leg hole. Can you tell me what the correct angle
for that hole is?
Bent |
Bent i have an angle for the holes on my guitar is
10*
_________________
Sandwich Productions
https://www.facebook.com/sandwichproducts/ |
|
|
|
Bill Ford
From:
Graniteville SC Aiken
|
Posted 28 May 2007 2:53 pm
|
|
Bent,
The sander with 180/320/1000 paper, then buffing is the way to go depending on how bad the scratches are, you may want to skip to finer grit.(What Dennis said,)Look around for an old electric motor and fit it with an arbor to accept at least a 5" buffing pad, get some gloves and have at it. Be sure to fasten it to something solid.
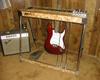
Finish/stain...If you haven't decided on color, or how to get the color you want, go to a shoe repair shop and get leather dye,only takes a couple dabs to do a full cabinet. That is what I used to get the red on mine.Check this dye job that Emmett did on his.
http://bb.steelguitarforum.com/viewtopic.php?t=110068
If you use wood necks, be sure to leave a gap between where aluminum meets wood(at each end of the neck), a piece of paper will usually be enough gap.This will help eliminate detuning due to temp change.
_________________
Bill Ford S12 CLR, S12 Lamar keyless, Misc amps&toys Sharp Covers
Steeling for Jesus now!!! |
|
|
|
Bent Romnes
From:
London,Ontario, Canada
|
Posted 28 May 2007 3:43 pm
|
|
Ooohh wow! Bill that's a great finish! I'll remember that one.
So this leather dye it soaks in evenly without blotching? It sounds like an aniline dye for wood or the alcohol-based stains that are real runny and soak in without any hiding qualities at all.
And the lacquer...is it regular thinner-based lacquer used for wood finishing?
I'll be sure to remember this.
Yes, I will be using wood neck.
Ed Fulawka told me the same thing...about the crack for expansion. I may as well listen to experience here.
Got the neck made. Birds eye maple. Thanks for the tips! |
|
|
|
Bill Ford
From:
Graniteville SC Aiken
|
Posted 29 May 2007 4:58 am
|
|
Bent,
I have used both "water white" furniture grade lacquer, also automotive clear with good results. A neat trick using leather dye is if you sand/buff through and uncover raw wood, you can fix it by just rubbing more dye on the light spot. Spray a couple of light/medium coats, buff with 0000 steel wool, do this two, or three times, when you're satisfied with the finish, buff one last time and rub with a superfine rubbing compound (don't install the neck till you finish spraying, and buffing) then top off with a good grade clearcoat wax. Hope this helps some..
BF
_________________
Bill Ford S12 CLR, S12 Lamar keyless, Misc amps&toys Sharp Covers
Steeling for Jesus now!!! |
|
|
|
Bent Romnes
From:
London,Ontario, Canada
|
Posted 29 May 2007 7:00 am
|
|
Bill,
Thanks again for the valuable info. I'll have to print all this and put it in a binder to keep for reference as I work away.
I am thankful to you guys who contribute with your advice.
See, this is quite a unique project seeing as I have no tools to speak of. For example, I am using a friend's drill press.
So far, things are working out great. I have been working on the changer mech. Got the triple raises and lowers made. Friday I will drill and cut out the fingers. I'll be putting oil-lite bushings in them. Using a 1/2" shaft.
Just give me more of your advice as the spirit moves you all. It is deeply appreciated.
Regards,
Bent |
|
|
|
Bent Romnes
From:
London,Ontario, Canada
|
Posted 2 Jun 2007 8:20 am
|
|
Just a little update.
Here is a pic of the changer mech.
The shine came up like a million bucks on the 6061 aluminum finger! The pic does not do it justice.
Thanks Bill, Jani, Ron and everybody for your great advice. I did the sandpaper thing right up to 1000 then rubbed it vigorously on a cloth saturated with Autosol.
The parts are not drilled yet except for what you see on the finger, which is a 5/8" hole to put a 1/2" ID oilite bushing into.
So far so good is about all I can say for now.
The hand-making of those fingers is tedious work. I have made 5 so far. Monday I will buy the rest of the birdseye maple and start on the body. I need a break from the drudgery!
Bent
 |
|
|
|