| Author |
Topic: The Pettingill Cruiser |
Tom Pettingill
From:
California, USA (deceased)
|
 Posted 14 Oct 2009 7:03 pm
 |
|
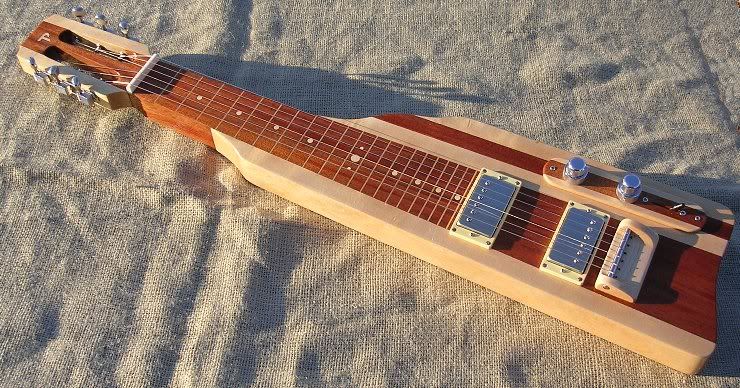
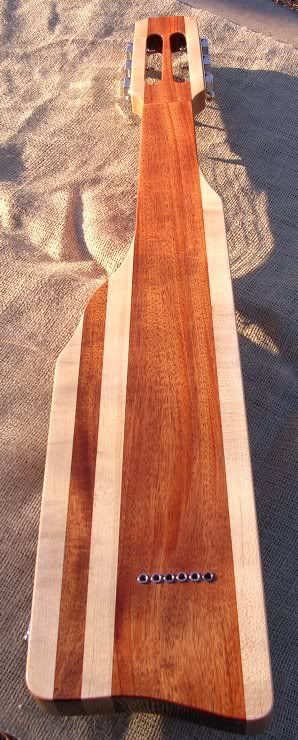
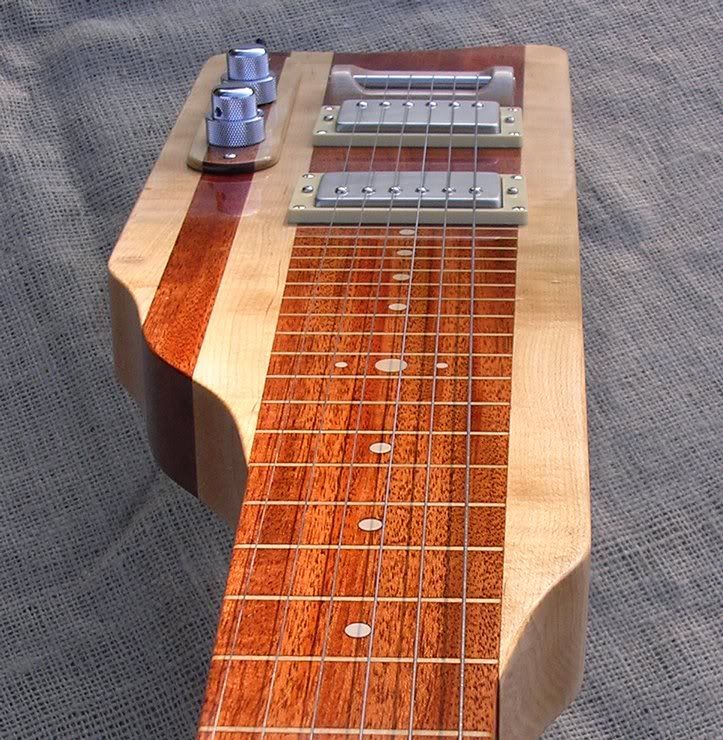
Here is another new one, or perhaps more correctly stated, an evolution of my asymmetrical style using my neck through design with an integrated fretboard.
The woods are Honduran mahogany with hard rock sugar maple.
Fret lines are basswood and position markers and logo are 20,000 year old Woolly Mammoth ivory.
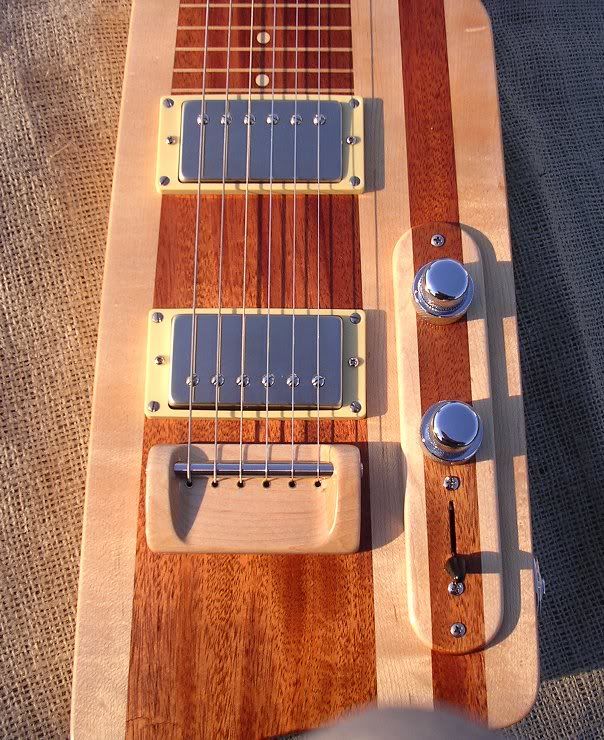
The pickups are a couple sweet hand wound units from BG-Pups, a Lizard model neck and a BG Dark bridge.
The controls are double stacked pots so each pickup has it own volume and tone.
This one is 22.5, but would make a great long scale and would also make a wonderful 8 stringer.
And some pics
.

_________________
Some misc pics of my hand crafted steels
Follow me on Facebook here |
|
|
 |
Bill Creller
From:
Saginaw, Michigan, USA (deceased)
|
 Posted 14 Oct 2009 7:27 pm
 |
|
Very impressive work!! It's really a beauty Tom  |
|
|
 |
Tom Pettingill
From:
California, USA (deceased)
|
 Posted 14 Oct 2009 8:36 pm
 |
|
Thanks Bill ... I am very happy how it came out. Its very resonant and quite loud acoustically. Plugged in it has a lot of sweet tone options with the two pickups and blending options in the middle position. The independent volume and tone controls is a worthy option on a 2 pickup guitar.
_________________
Some misc pics of my hand crafted steels
Follow me on Facebook here |
|
|
 |
Jim Cohen
From:
Philadelphia, PA
|
|
|
 |
Leroy Beal
From:
California, USA
|
 Posted 14 Oct 2009 9:26 pm
 |
|
Gorgeous! I bet it really sings.
_________________
Leroy Beal |
|
|
 |
Mike Neer
From:
NJ
|
 Posted 15 Oct 2009 3:51 am
 |
|
The TP Cruiser...I like that.
Timeless look. I like the bridge a lot.
_________________
Links to streaming music, websites, YouTube: Links |
|
|
 |
Dennis Brown
From:
Gowen, Mi. USA
|
 Posted 15 Oct 2009 4:18 am nice
 |
|
SWEEEEEEEEEEEEEEEEEEEEEEEEEET............... 
Very, Very Nice Tom.
Dennis. |
|
|
 |
Peter Jacobs
From:
Northern Virginia
|
|
|
 |
Mark Mansueto
From:
Michigan, USA
|
|
|
 |
Roy Thomson
From:
Wolfville, Nova Scotia,Canada
|
 Posted 15 Oct 2009 6:19 am
 |
|
Beautiful work Tom. Dream Lap Steel!
I do not care for the second pick up creating
a need to shorten the fret board however. Could
not both pick ups be placed side by side so as to
allow the frets to extend to 24 rather than
21 as shown?
Just curious.
Roy
In Admiration of Your Work
_________________
Custom Tabs Various Tunings
Courses Lap Steel, Pedal Steel |
|
|
 |
Tom Pettingill
From:
California, USA (deceased)
|
 Posted 15 Oct 2009 6:50 am
 |
|
Thanks all, your kind words and input is much apreciated!
Jim ... I actually did have a bit of Mammoth ivory laying around. A while back I bought some trimmings / scrap off a carver. There is actually a pretty decent supply out there, most is being found in the frozen tundra in Siberia.
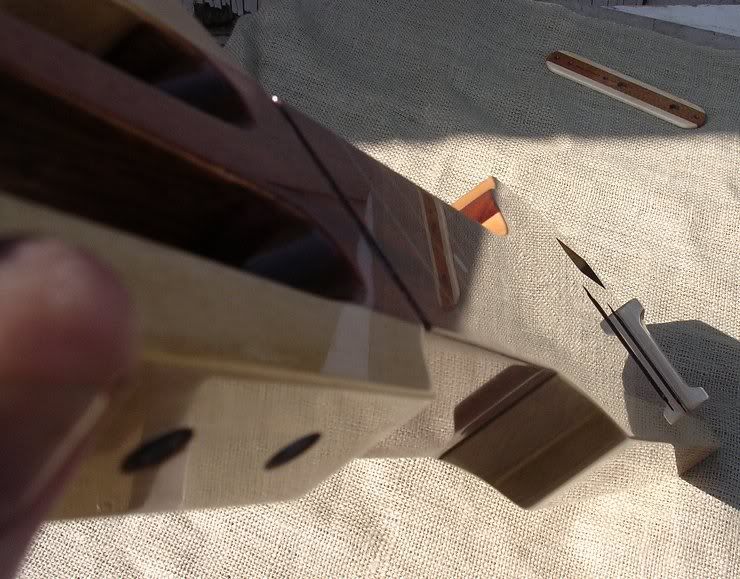
Mike and Peter ... I first used that bridge design on one of my 8 string Deco models and was extremely pleased with the results. Its a set bridge and has great coupling to the body. Its hard to see in the pics, but I line the through string holes in the plate with brass tubing that extends about 1/2" into the body. The extended tubing helps me to exactly relocate the bridge come assembly time.
Mark ... Its a bit more of a pain to do the control covers like that, but I love the subtle detail it adds.
Roy ... the second pickup could certainly be moved down. The result would be a little bit brighter tone out of the neck pickup. Rule of thumb, the closer to the bridge, the brighter the tone.
I chose to center it on the 24th fret as that is a traditional location and a harmonic node.
_________________
Some misc pics of my hand crafted steels
Follow me on Facebook here |
|
|
 |
Dennis Brooker
From:
Iowa, USA
|
 Posted 15 Oct 2009 8:27 am
 |
|
| Nice one Tom - DB |
|
|
 |
Larry Weaver
From:
Asheville, North Carolina, USA
|
 Posted 15 Oct 2009 8:38 am
 |
|
| Wow, simply stunning work Tom! Really liking your bridge design. |
|
|
 |
Tom Pettingill
From:
California, USA (deceased)
|
|
|
 |
Mark Bracewell
From:
Willow Glen, California
|
 Posted 15 Oct 2009 5:09 pm
 |
|
He's done it again - sheesh, I'd be happy if I could just take photos that good, but Tom, that is just a perfect finish - FLAT - you use a microscope, right???
   |
|
|
 |
Stephen Abruzzo
From:
Philly, PA
|
 Posted 15 Oct 2009 7:30 pm
 |
|
Really nice steel there Tom. Like a marriage between your Deco and Supro Comet styles??
What tuning is she strung to? What type of music prompted that selection of BG pups?
Just beautiful. |
|
|
 |
Tom Pettingill
From:
California, USA (deceased)
|
 Posted 16 Oct 2009 7:30 am
 |
|
Thanks Mark and Steve 
Mark ... no microscope, but I couldn't get along without my magnified visor.
Steve ... Its definitely a blend of several of my design elements.
Its strung in C6, the owner does movie / film scores and wanted something that could do sweet and lush cleans, but still get down and dirty.
_________________
Some misc pics of my hand crafted steels
Follow me on Facebook here |
|
|
 |
Tom Pettingill
From:
California, USA (deceased)
|
|
|
 |
James Kerr
From:
Scotland, UK
|
 Posted 18 Oct 2009 2:59 pm
 |
|
Made by a Craftsman, a delight to see.
James. |
|
|
 |
Larry Weaver
From:
Asheville, North Carolina, USA
|
 Posted 18 Oct 2009 3:39 pm
 |
|
Great idea with the brass tubing Tom!
Thx for posting detailed pics. Truly superb and inspiring work! |
|
|
 |
Tom Pettingill
From:
California, USA (deceased)
|
|
|
 |
Tom Pettingill
From:
California, USA (deceased)
|
 Posted 20 Oct 2009 6:48 am
 |
|
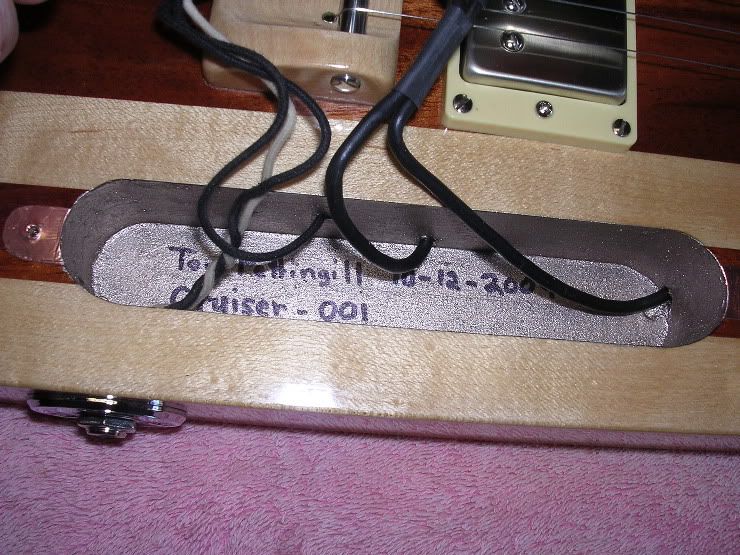
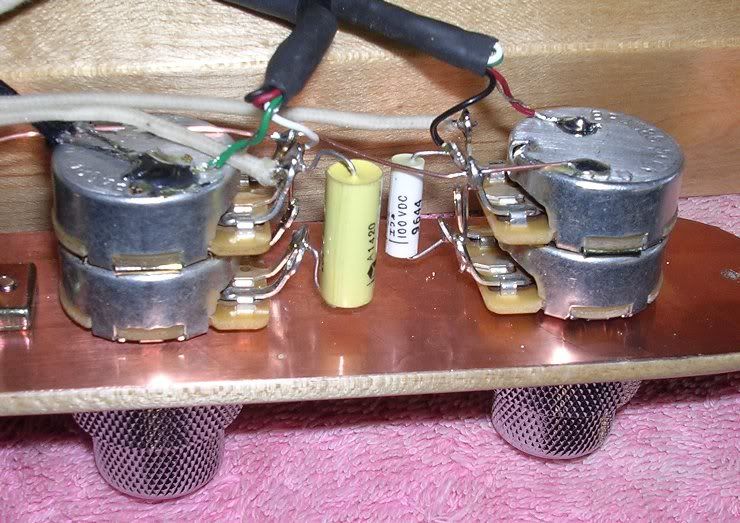
I was going through my pics and thought I'd post these of how I've been doing the shielding recently.
I used to do all copper, but I am now using copper for the cover and copper tabs out of the cavity with a high end conductive silver plated copper based paint in the cavity.
This paint is much better than the gray carbon based stuff and is pretty pricey, but a little goes a long way.
.
_________________
Some misc pics of my hand crafted steels
Follow me on Facebook here |
|
|
 |
Larry Weaver
From:
Asheville, North Carolina, USA
|
 Posted 21 Oct 2009 6:23 am
 |
|
Well it's easy to see that your superb build quality extends to the electronics. Seriously, this is a pleasure to look at.
Tom, if you don't mind me asking, what did you use to shape the bridge? |
|
|
 |
Allan Munro
From:
Pennsylvania, USA and Scotland
|
 Posted 21 Oct 2009 7:10 am
 |
|
| Larry Weaver wrote: |
| ...Tom, if you don't mind me asking, what did you use to shape the bridge? |
I was going to ask that very question. I have tried that method with the brass guide tubes (on a Tele-ish thing I made some years ago) and had big problems making the brass completely flush with the wood.
I have added Mr. Tom to my list of hero's. (near the top)
Regards, Allan.....
_________________
Only nuts eat squirrels.
Television is the REAL opiate of the masses! |
|
|
 |
Tom Pettingill
From:
California, USA (deceased)
|
 Posted 21 Oct 2009 8:02 am
 |
|
| Quote: |
if you don't mind me asking, what did you use to shape the bridge?
I was going to ask that very question. |
Sure, always happy to share.
I start with a squared off block and first bore a hole through the length for the rod.
I then lay out and drill the string through holes using a printed out paper template affixed with some double sided tape.
A couple notes here ... I use a carbide scribe to make a pin point mark for the hole's center. An awl, center punch, etc will work too.
Use brad point wood bits for the drilling. With a brad point bit, you can accurately drop the point into your center mark with no troublesome bit wandering. I do this alignment in the drill press with it off, gently drop the bit in and rotate the chuck by hand in a counter clockwise / reverse direction to lock in the position.
For shaping the cutout section, I use a template I made and a router.
I align the center mark on the bridge blank to the template centerline and affix the two together with double sided tape.
For bits, I use a 1/4" bit with a 3/4" top bearing and a 1/2" round nose bit with a 1/2" top bearing.
I use the 1/4" bit with the 3/4" bearing to cut the center down to height taking several shallow passes.
The 3/4" bearing keeps the cut 1/4" short on the sides so I can use the 1/2" round nose to do a nice side radius.
Once routed, I clean it up a bit with some 100 grit then glue the brass in with some medium thick slow(er) setting CA, (aka super glue).
I then use some flat and half round jewelers files to level off the brass, then finish sand with small wood blocks and sandpaper glued to a piece of 1/2" copper pipe.
Hope that made some sence.
_________________
Some misc pics of my hand crafted steels
Follow me on Facebook here |
|
|
 |


