| Author |
Topic: Emmons P/P half stop ....new photos added |
Tony Glassman
From:
The Great Northwest
|
 Posted 19 Mar 2009 11:39 am
 |
|
I have a D-10 P/P that has a full 2nd string lower on the E9th (D#-->C#) with the usual Emmons half stop set-up. The 2nd string raise finger is pulled up against the body with a spring. The detente @ "D" occurs when the raise finger contacts the resistance of the lower finger.
It works great, but it eliminates the ability to raise the 2nd string D#-->E.
Anybody have a photo of the alternative push-pull 2nd string half stop setup, that allows the 2nd string raise as well?
Last edited by Tony Glassman on 22 Mar 2009 6:07 pm; edited 1 time in total |
|
|
 |
Peter Freiberger
From:
California, USA
|
Posted 19 Mar 2009 3:19 pm
|
|
| I used to lower string 2 the way all the other lowers are done on a P/P and use a 1/2 tone tuner to pick up a lower for the string 9 as string 2 hit a D. You can adjust the string 9 return spring for as firm a half stop as you like. That makes a raise for string 2 possible. |
|
|
|
Russ Tkac
|
Posted 19 Mar 2009 5:31 pm
|
|
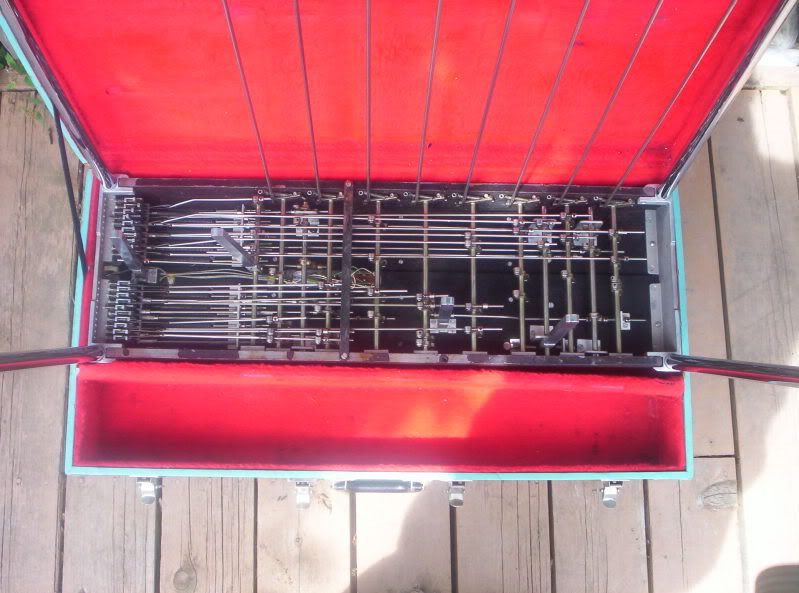
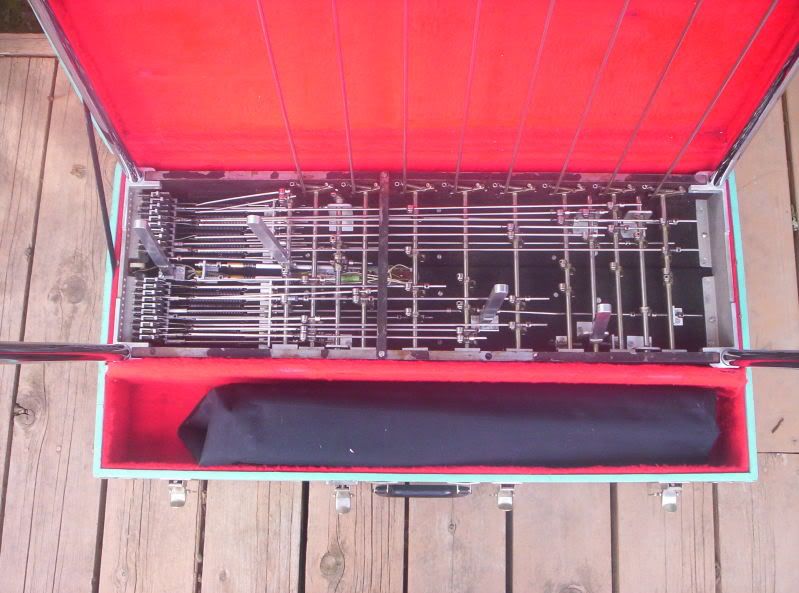
I went to Chicago to Dave Peterson's place and had him set my Emmons steel up. I kept the basic set up the same but added two feel stops. One that lowers 2 from D#-D-C# and lowers 9 from D-C# and one the raises 1 from F#-G-G# and 2 from D#-E. I also had Dave re-setup the C neck. Here are the before and after pictures you'll have to contact Dave if you have any questions.
Go Wings! 
 |
|
|
|
Tony Glassman
From:
The Great Northwest
|
Posted 19 Mar 2009 6:55 pm
|
|
Russ......that's perfect. Exactly what I wanted to see.
Peter....thanks for your input. I'd already considered the solution you described , but I want to avoid having an adjustable tuner buried down amongst the push rods....seems like that would be difficult to tweak at a gig. |
|
|
|
Jack Stanton
From:
Somewhere in the swamps of Jersey
|
Posted 20 Mar 2009 3:53 am
|
|
| The beauty of a p/p is you don't have to tweak very often. |
|
|
|
Tony Glassman
From:
The Great Northwest
|
Posted 20 Mar 2009 6:42 am
|
|
| Jack Stanton wrote: |
| The beauty of a p/p is you don't have to tweak very often. |
You're right, it's not often that you need to tweak a p/p........but, it's better to have easy "tweak-ability" for those rare instances when you do need to adjust it. |
|
|
|
C Dixon
From:
Duluth, GA USA
|
Posted 21 Mar 2009 10:30 am
|
|
That is a great job. Looks neat AND professional. I commend the work by Dave Peterson.
But I agree that it would be difficult to adjust. So, very respectfully I would recommend doing it thusly:
Instead of locating the half stop adjusters on the bottom of the guitar, simply use the OTHER side of the appropriate bellcrank holes instead, and mount the rods, adjusters and stop*, up in the air (viewed as shown in the photos above). This then would make them easier to get to as well as adjust.
carl
* Both stops could be located on the same "half stop" bracket that Emmons supplies on their "Le Grandes". One stop on one side and the other stop on the other side of the bracket.
_________________
A broken heart + † = a new heart. |
|
|
|
Tony Glassman
From:
The Great Northwest
|
Posted 21 Mar 2009 12:06 pm
|
|
Charlie. I agree.
The tuner needs to be easily accessible. It should be be located at the level of the pull-rods, similar to the 4th string E->F p/p tuner.
Emmons sells their half stop assembly for a whopping $208.00 !!! I'll make my own. |
|
|
|
C Dixon
From:
Duluth, GA USA
|
Posted 21 Mar 2009 12:34 pm
|
|
| Quote: |
| Emmons sells their half stop assembly for a whopping $208.00 !!! I'll make my own. |
Yes that is the entire "half stop" assembly, but still a ridiculous price, none the less, IMO.
I doubt the bracket itself would be any where near that price. If so, I agree, and would make it and the other parts myself.
c.
_________________
A broken heart + † = a new heart. |
|
|
|
Russ Tkac
|
Posted 21 Mar 2009 3:19 pm
|
|
| The good news. I haven't had to touch it since I picked it up in August of last year and it added $100 to my bill including parts and labor. |
|
|
|
Tony Glassman
From:
The Great Northwest
|
Posted 21 Mar 2009 4:38 pm
|
|
| Russ Tkac wrote: |
| The good news. I haven't had to touch it since I picked it up in August of last year and it added $100 to my bill including parts and labor. |
Russ......how strong does the 1/2 stop @ "D" feel? Is it pretty solid ? |
|
|
|
Tony Glassman
From:
The Great Northwest
|
Posted 21 Mar 2009 4:59 pm
|
|
| C Dixon wrote: |
Instead of locating the half stop adjusters on the bottom of the guitar, simply use the OTHER side of the appropriate bellcrank holes instead, and mount the rods, adjusters and stop*, up in the air (viewed as shown in the photos above). This then would make them easier to get to as well as adjust.
|
Carl
If you just make the bracket taller and place the spring so it compresses against the other side of the bracket (the side closest to the changer) it would work with the standard Emmons tapped swivel-drilled out screw assembly mounted on the top arm of the bell-crank.
Also you can adjust the stiffness of the half-stop detente by pre-loading the spring. (By pre-loading, I mean adjusting the movable collar so the spring is more compressed while in the non engaged position).
The problem with compression pre-loading is that unless you have the perfect spring (one that is not too short, and has a suitable stiffness [K], it may compress too early and interfere with the 2nd half of the change (D-> C#).
IMO that's the beauty of the standard Emmons half stop, where the raise finger is held by a spring against the body. Instead of compressing the spring, it stretches the spring so there's no risk of a premature end-point. The downside is: no D# -> E change. |
|
|
|
Russ Tkac
|
Posted 21 Mar 2009 5:22 pm
|
|
| Tony it feels good. Just enough to know I'm there. |
|
|
|
C Dixon
From:
Duluth, GA USA
|
Posted 21 Mar 2009 5:50 pm
|
|
Tony,
I agree.
Carl
_________________
A broken heart + † = a new heart. |
|
|
|
Darvin Willhoite
From:
Roxton, Tx. USA
|
Posted 21 Mar 2009 6:24 pm
|
|
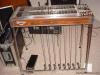
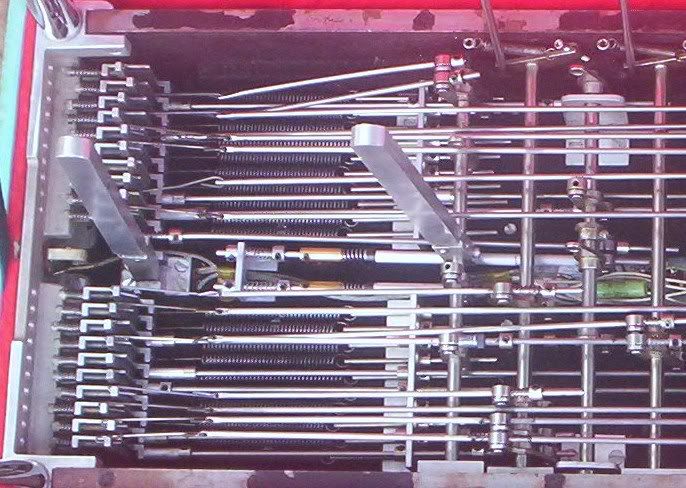
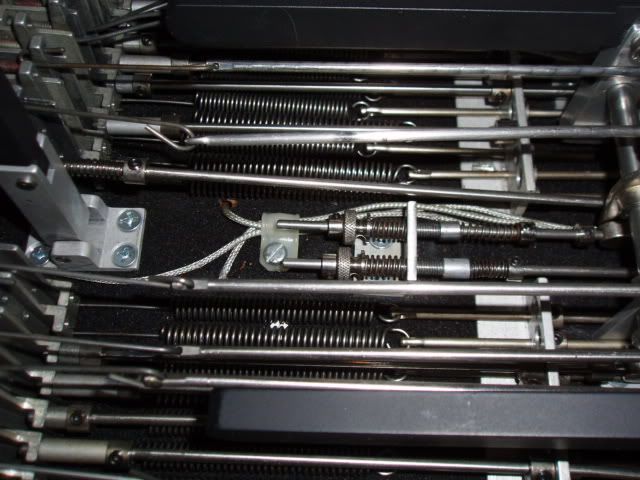
Here's a double tuneable half stop I made for my P/P, the operation is similar to the one Russ showed above. One stop is on the second string, the other is on the sixth string. You can see the bellcrank and collar on the upper one. The tension can be tightened or loosened by moving the setcollar at the RH end of the spring. The tuning is done by the thumb screw. The spring on the LH side of the bracket keeps the thumb screw from turning on its own.
_________________
Darvin Willhoite
MSA Millennium, Legend, and Studio Pro, Reese's restored Universal Direction guitar, a restored MSA Classic SS, several amps, new and old, and a Kemper Powerhead that I am really liking. Also a Zum D10, a Mullen RP, and a restored Rose S10, named the "Blue Bird". Also, I have acquired and restored the plexiglass D10 MSA Classic that was built as a demo in the early '70s. I also have a '74 lacquer P/P, with wood necks, and a showroom condition Sho-Bud Super Pro. |
|
|
|
Tony Glassman
From:
The Great Northwest
|
Posted 21 Mar 2009 9:50 pm
|
|
| Darvin Willhoite wrote: |
Here's a double tuneable half stop I made for my P/P, the operation is similar to the one Russ showed above. One stop is on the second string, the other is on the sixth string. You can see the bellcrank and collar on the upper one. The tension can be tightened or loosened by moving the setcollar at the RH end of the spring. The tuning is done by the thumb screw. The spring on the LH side of the bracket keeps the thumb screw from turning on its own.
|
Sweeeeeeet! |
|
|
|
Billy Knowles
From:
Kenansville, N. C. 28349 usa
|
Posted 22 Mar 2009 4:48 am thread
|
|
Darvin
How do the thumb screws work, I don't see any thread on the rod? It is a great idea.
Thanks
BIlly |
|
|
|
Bo Borland
From:
South Jersey -
|
Posted 22 Mar 2009 4:58 am
|
|
| Nice work!! Billy , it looks like the threads are there, between the pairs of hex locked collars. The ones on the thumb screw side are hidden by the springs. |
|
|
|
C Dixon
From:
Duluth, GA USA
|
Posted 22 Mar 2009 7:20 am
|
|
| Quote: |
| How do the thumb screws work, I don't see any thread on the rod? |
I see the thread, but for the life of me I have not figured out how this system works. But I agree, it is a great job, how ever it works.
I still would prefer the adjusters be easier to reach, as stated before. Unlike some apparently, I am adjusting things like this somewhat often, more or less. So the easier the access the better in my case.
The late and great steel player, Mac Atcheson, once did something similar to this where the adjusters were accessible at the right end plate. I wish I could remember how he did it, but I have simply lost that memory "bank" 
Oh well
carl
_________________
A broken heart + † = a new heart. |
|
|
|
Tony Glassman
From:
The Great Northwest
|
Posted 22 Mar 2009 8:28 am
|
|
| C Dixon wrote: |
| Quote: |
| How do the thumb screws work, I don't see any thread on the rod? |
I see the thread, but for the life of me I have not figured out how this system works. But I agree, it is a great job, how ever it works.
I still would prefer the adjusters be easier to reach, as stated before. Unlike some apparently, I am adjusting things like this somewhat often, more or less. So the easier the access the better in my case.
The late and great steel player, Mac Atcheson, once did something similar to this where the adjusters were accessible at the right end plate. I wish I could remember how he did it, but I have simply lost that memory "bank"
Oh well
carl |
My guess is that their is an inner pushrod passes through an externally threaded sleeve. The pushrod has a collar on it near the bellcrank, which must be the feel stop.
The sleeve/rod assembly then passes through a tapped hole in the bracket. As you rotate the thumb wheel it moves the sleeve closer or farther from the bell crank. The inner rod moves similarly as the thumb wheel contacts the collar on the inside rod closest to the changer. That in turn changes the point of impact between the other collar and the bellcrank. The spring compression provides the detente.
This is just a guess and could be total B.S. |
|
|
|
chris ivey
From:
california (deceased)
|
Posted 22 Mar 2009 11:11 am
|
|
| these are just like the half stops i've always made for my pushpulls. simple and logical. had mine for 20 years. |
|
|
|
C Dixon
From:
Duluth, GA USA
|
Posted 22 Mar 2009 11:47 am
|
|
Then I have got to be the most illogical person on earth. Cuz I continue to be UN able to figure out how this sapsucker achieves its "adjustable" purpose. The only thing that makes sense to me is the ability to adjust the tension "feel" of the half stop.
But WHAT in blue blazes does adjusting those knurled knobs do to change the "pitch" of the half stop, anyway?
Can someone explain it in simple OR extroadinarily technical detail (preferably the latter) so that a dumbhead like me can see how it works.
Cuz I give up. What am I missing?
carl
_________________
A broken heart + † = a new heart. |
|
|
|
richard burton
From:
Britain
|
Posted 22 Mar 2009 12:43 pm
|
|
Carl,
It looks to me as if the 1/2 tone gap is between the bellcrank and the collar of the 1/2 tone tuning device.
The mounting bracket is tapped.
The piece that passes through the mounting bracket is hollow, and threads into the mounting bracket, and is turned by the knurled adjuster.
The rod that is attached to the bellcrank passes through the hollow adjusting piece.
The half tone pressure is adjusted by a collar attached to this rod.
The position of this rod (and therefore the half tone position) is governed by the collar to the left of the knurled nut.
That's how I see it, I may well be way off beam |
|
|
|
Tony Glassman
From:
The Great Northwest
|
Posted 22 Mar 2009 4:28 pm illustrated photo!
|
|
Carl,
Turning the knurled nut counter-clockwise moves the threaded outer sleeve thru the tapped hole in the bracket (B) to the left, which
increases the distance between collar 1 and B,
this in turn moves collar 3, increasing the distance between it and the bellcrank
thus the impact point of the bellcrank at the collar (feel-stop) moves farther away (or sharper in pitch)
 |
|
|
|
Tony Glassman
From:
The Great Northwest
|
Posted 22 Mar 2009 6:22 pm
|
|
NOTE in illustrated photo:
The label for the Outer Theaded Sleeve is off-target. It should be pointing just left of the spacer to the threaded rod that passes through the bracket (B).
sorry! |
|
|
|